First off, what is a Constraint in Oracle’s Primavera P6? Constraints are date restrictions placed on activities throughout the project. Each activity’s start and finish dates are calculated in the project schedule based off the duration of the activity, the relationship logic and its assigned calendar.
Often times changes need to be made to the schedule that were not anticipated during the project planning process. Constraints allow project managers and schedulers to modify either the start or finish date of an activity that doesn’t follow the initial logic designed in the project.
Figure 1 shows where Constraints are manually assigned on the Status tab. It is not very apparent to know which activities have a Constraint assigned, since you would have to click on each activity individually and check the Status tab.

Figure 1: Primavera P6 Constraints
Our students often ask during our online Primavera P6 training classes on how they can identify which activities have a Constraint. This article will show several different ways to easily see which activities are Constrained.
1) Start and Finish Column
The Start and Finish column in the activity table will show an asterisk after the date for any Constrained activity.
For any activity that has a Constraint on the start date, the * will show in the Start date column. Similarly, the * will be in the Finish date column, if that activity has a finish Constraint.
By simply adding the Start and Finish date columns, you can easily see any activity that has a Constraint. Figure 2 shows activity EC1090 has a Start Constraint and activity EC1380 has a Constraint on the Finish date.

Figure 2: Primavera P6 Start and Finish Columns
2) Primary and Secondary Constraint Columns
Columns of Primary Constraint, Primary Constraint Date, Secondary Constraint and Secondary Constraint Date can be shown on the activity table. When you add these columns, you will be able to see the type of Constraint and the date set for the Constraint as shown in Figure 3. These columns are more helpful since you are able to see all the detailed information about the Constraints.

Figure 3: Primavera P6 Primary and Secondary Constraint Columns
3) Schedule Text Report
Whenever the project is scheduled, a text report is automatically created. Before you schedule the project from the Schedule dialog box, you will need to checkmark “Log to file” then click the Schedule button. Scheduling gets Primavera to calculate the schedule dates of all the activities in the project. Next, open the Schedule dialog box again, then click the View Log button. Figure 4 below shows the “Log to file” checkmark box, the Schedule and View Log buttons.

Figure 4: Primavera P6 Shedule Dialog Box
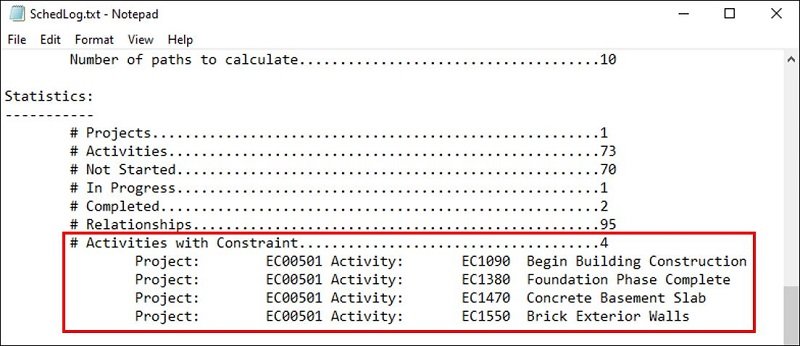
The text report that opens has a lot of useful information. In the Statistics section of the report, the number of “Activities with Constraint” will be listed, as seen in the example in Figure 5.

Figure 5: Primavera P6 Schedule Text Report
4) Filters
Two of the standard Default Filters in Primavera are the Constraints Filters. After checkmarking both “Has Finish Constraint” and “Has Start Constraint” you MUST also change another field.
Under “Show activities that match”, select “Any selected filter”.
For “Show activities that match”:
- “All selected filters” – Indicates the activities must meet all parameters of the filters activated. For example, all of the activities must have both a Finish Constraint AND a Start Constraint on it.
- “Any select filter” – Indicates the activities must meet only one criteria of the filters activated. For example, the activities can either have a Finish Constraint OR a Start Constraint.
Figure 6 highlights the two Constraints Filters to checkmark and the “Any selected filter” criteria.

Figure 6: Primavera P6 Filters
For our Constraints filter report, you want to ensure “Any selected filter” is chosen because you want to show any activity that can have either a Start OR Finish Constraint applied to it. It would be very rare to have a single activity with a Constraint on both of it’s Start and Finish Dates. Figure 7 shows any activity that has either a Start or Finish Constraint date.

Figure 7: Primavera P6 Activity Table with Constraints Filters
Summary
It is a best practice to limit the use of Constraints on your project activities because it is preferred to keep your projects flexible. However, there are occasions where it’s needed to modify either the start or finish of a task that doesn’t necessarily follow the logic project planners initially designed for the network. Unplanned circumstances such as broken equipment, delayed materials shipments or other unforeseen delays occur.
It isn’t easy to see which activities have a Constraint restriction on it. Since you would have to view the Status tab and then individually scroll through every single activity to see if it has a Constraint. Now you don’t have to go through this cumbersome process since we have shown you know several different ways for you to quickly and easily determine which activities in the project are Constrained.
For a full overview of our project management online training classes via the Primavera P6 software, visit our Training Courses page.
The post How to Tell Which Activities Have a Constraint in Primavera P6 Professional appeared first on P6 Consulting.